Trending
The ultimate guide to using essential oils and face rollers for acne-prone skin
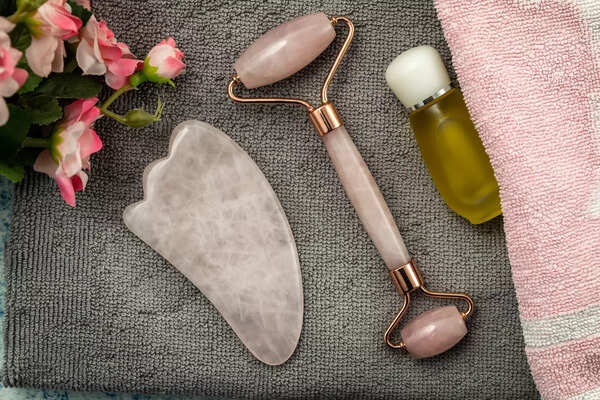
Cleanse, dilute, and apply essential oils like Tea Tree, Lavender, Frankincense, Geranium, and Chamomile with a face roller made of jade or rose quartz for acne-prone skin care.

Dealing with acne-prone skin can be a challenging and frustrating experience. However, incorporating essential oils and face rollers into your skincare routine can provide natural and effective solutions. This comprehensive guide will walk you through the steps of selecting the right essential oils, proper dilution, and the correct use of face rollers to soothe and improve your skin. By following these steps, you can achieve a clearer, healthier complexion while embracing a relaxing and therapeutic skincare ritual. 111238800Step 1: Choose the Right Essential Oils
Select essential oils that are known for their anti-inflammatory, antimicrobial, and soothing properties. Good choices for acne-prone skin include:
Tea Tree Oil: Known for its antibacterial properties.
Lavender Oil: Has anti-inflammatory and calming effects.
Geranium Oil: Balances oil production and has antibacterial properties.
Chamomile Oil: Soothes irritation and inflammation.
Step 2: Dilution
Essential oils are potent and can irritate the skin if not properly diluted. Mix your chosen essential oil with a carrier oil such as jojoba oil, grapeseed oil, or sweet almond oil. A safe dilution ratio for facial use is typically 1-2% essential oil to carrier oil. For example, for 1 tablespoon (15 ml) of carrier oil, add 2-6 drops of essential oil.
Step 3: Cleanse Your Face
Before using the face roller, cleanse your face thoroughly with a gentle cleanser suited for acne-prone skin. Pat your skin dry with a clean towel.
Step 4: Apply the Essential Oil Blend
Take a small amount only a few drops of your diluted essential oil blend and gently apply it to your face. Focus on areas prone to acne but avoid the delicate eye area.

Step 5: Use the Face Roller
Choose a face roller made from materials like jade or rose quartz, as these are gentle on the skin and offer additional benefits such as cooling and soothing effects. Start rolling from the centre of your face outward, using gentle pressure. Roll in upward and outward motions:
Forehead: Roll upwards towards the hairline.
Cheeks: Roll outwards towards the ears.
Jawline: Roll downwards towards the chin.
Neck: Roll upwards towards the jawline.
Step 6: Clean and Store Your Roller
After use, clean your face roller with mild soap and water, then dry it thoroughly before storing it in a cool, dry place.
Step 7: Follow Up with Skincare Routine
After using the face roller, you can follow up with your regular skincare routine, such as applying a moisturizer or spot treatment suitable for acne-prone skin.
Inputs by Vibhuti Arora – Face yogi and founder of House of Beauty
Select essential oils that are known for their anti-inflammatory, antimicrobial, and soothing properties. Good choices for acne-prone skin include:
Tea Tree Oil: Known for its antibacterial properties.
Lavender Oil: Has anti-inflammatory and calming effects.
Frankincense Oil: Helps with inflammation and skin regeneration.
Geranium Oil: Balances oil production and has antibacterial properties.
Chamomile Oil: Soothes irritation and inflammation.
Step 2: Dilution
Essential oils are potent and can irritate the skin if not properly diluted. Mix your chosen essential oil with a carrier oil such as jojoba oil, grapeseed oil, or sweet almond oil. A safe dilution ratio for facial use is typically 1-2% essential oil to carrier oil. For example, for 1 tablespoon (15 ml) of carrier oil, add 2-6 drops of essential oil.
Step 3: Cleanse Your Face
Before using the face roller, cleanse your face thoroughly with a gentle cleanser suited for acne-prone skin. Pat your skin dry with a clean towel.
Step 4: Apply the Essential Oil Blend
Take a small amount only a few drops of your diluted essential oil blend and gently apply it to your face. Focus on areas prone to acne but avoid the delicate eye area.
Step 5: Use the Face Roller
Choose a face roller made from materials like jade or rose quartz, as these are gentle on the skin and offer additional benefits such as cooling and soothing effects. Start rolling from the centre of your face outward, using gentle pressure. Roll in upward and outward motions:
Forehead: Roll upwards towards the hairline.
Cheeks: Roll outwards towards the ears.
Jawline: Roll downwards towards the chin.
Neck: Roll upwards towards the jawline.
Turmeric Power! Make This DIY Cleanser For Radiant Skin
Step 6: Clean and Store Your Roller
After use, clean your face roller with mild soap and water, then dry it thoroughly before storing it in a cool, dry place.
Step 7: Follow Up with Skincare Routine
After using the face roller, you can follow up with your regular skincare routine, such as applying a moisturizer or spot treatment suitable for acne-prone skin.
Inputs by Vibhuti Arora – Face yogi and founder of House of Beauty

About the Author
TOI Lifestyle DeskEnd of Article
FOLLOW US ON SOCIAL MEDIA


Photostories
lifestyle videos
Featured In Lifestyle

MORE FROM ETIMES
life & stylePopular Categories
Entertainment NewsBollywood NewsTollywood NewsKollywood NewsMollywood NewsMovie ReviewsLatest Hindi MoviesLatest Tamil MoviesMX PlayerParenting TipsHome RemediesWeight LossBeauty TipsParenting TipsHindi VideosHindi Video SongsBhojpuri Music VideosLatest Telugu MoviesBhojpuri Music VideoHindi TV News
Trending in Entertainment
Latest MoviesBollywood MoviesHollywood MoviesTamil Movies 2024Telugu Movies 2024Malayalam Movies 2024Kannada Movies 2024Marathi Movies 2024Bengali Movies 2024Top Rated Movies 2024Best Hindi MoviesBest English MoviesBest Telugu MoviesBest Tamil MoviesBest Malayalam MoviesBest Kannada MoviesBest Bengali MoviesUpcoming Hindi MoviesBest Movies Of All TimeBest Hindi Movies of All Time
Trending in Etimes
Bone Health Fruits3 Year Relationship ProblemZaheer IqbalOptical IllusionHoney Kalonji Seeds BenefitsCareer HoroscopeSagarika GhatgeRahul MishraSunita WilliamsPumpkin Seeds DishesVegetables for EyesightMS DhoniHina KhanBreast CancerSonakshi SinhaSudha MurtyRaw Onion BenefitsThrifted VS New BooksBaby Names
Trending in TV
Trending in Lifestyle
Trending in Regional
Movie Reviews
Kalki 2898 - AD ReviewKooki ReviewSharmajee Ki Beti ReviewRautu Ka Raaz ReviewA Quiet Place: Day One ReviewFancy Dance ReviewMaharaj ReviewIshq Vishk Rebound ReviewHamare Baarah ReviewJNU: Jahangir National University ReviewPushtaini ReviewTrigger Warning ReviewThe Bikeriders ReviewThe Exorcism Review
Upcoming Hindi Movies
Upcoming Regional Movies
Latest News
Dr. Er. Rajainderr Jaina - Engineer and Architect by education, Artist by heartWhen Alia Bhatt holds back tears at best friend's wedding - emotional throwbackExclusive: Grandkid is learning to sing: Udit Narayan'Kalki 2898 AD' makers confirm sequel, reveal shoot almost completed!Why water shortage can leave economy parched, Moody's saysGear Up For The World Cup Final With These Relaxing Recliner ChairsWWE SmackDown June 28, 2024: LA Knight qualifies for the Money in the Bank Ladder match19-year-old dies after falling from Andheri flyover after hit by speeding vehicle2 traffic cops beat up driver, suspendedWhat! Red Panda spotted in Lower Dibang valley of Arunachal Pradesh'Kalki 2898 AD' box office collection day 3 early reports: The Prabhas and Deepika Padukone starrer is expected to surpass Rs 100 crore globally for third day in a rowWatch: Jasprit Bumrah leaves Reeza Hendricks clueless with a perfect outswingerCBI arrests journalist in NEET-UG paper leaks caseAishwarya Sakhuja visits underprivileged children suffering from cancer ahead of her father's birthdayExploring the ideal books for each zodiac sign: A literary journey6 essential yoga asanas every woman should practice for a healthier lifeAli Fazal recalls auditioning for Joy Lobo in Aamir Khan starrer '3 Idiots'Grave danger in equating court with temple, judge with God: CJI Chandrachud
Other Group Sites -
ETimes is an Entertainment, TV & Lifestyle industrys promotional website and carries advertorials and native advertising.